Make sure the boat is stationary and the engine is turned off while you are installing the Sensar Marine Boat Monitor.
Working near a battery can be dangerous and you should always follow the guidelines of your battery manufacturer. Avoid sparks or flames and make sure you have sufficient ventilation. Use eye protective gear and avoid touching your eyes. Wash hands when finished. Be careful when using metal tools as dropping them on a battery can create a short circuit, and possibly explosion or fire. Remove any personal items like rings, bracelets, necklaces, watches, or similar accessories.
Make sure the battery terminals are clean and the contacts are tightly fastened. Please mount cables to avoid wear and tear, and to prevent short circuits or sparks.

Boat Monitor

Battery/Bilge-pump Cable
(6 ft.)

Bilge Sentry
(cable 5 ft.)

Mounting bracket
%20(3).png?width=270&height=200&name=ID%20Card%20(1080%20x%20800%20px)%20(3).png)
Information card
(ID and connection code)

T-Splice Connector

T-splice cable

Cable Ties
(4 pcs.)

Cleaning wipes
(2 pcs.)

Mounting screws
(x8)

Double sided tape
(4 pcs.)
Mounting with screws: Using screws in fiberglass requires pre-drilled holes. The included screws are Phillips Pan Head No.6 (stainless steel) 3,5mm x 13mm. The recommended size for the pre-drilled hole is 2.946mm
Mounting with tape: The included tape has great adhesion. It will be hard to remove when attached to a surface. Clean the surface with the included cleaning wipes, or use another alcohol based cleaner. It will obtain full adhesion after 24 hours. When using tape, press and hold for 30 seconds.
- The Boat Monitor and Bilge Sentry units are sealed to make sure they always satisfy the manufacturer’s specifications to prevent electrical shock and fire hazards. No components inside can be repaired by unauthorized personnel. Do not try to open or repair yourself. Doing so can risk injury and/or damage, and the warranty will be void.
- When you connect the power cable, do not remove the fuse and/or fuse holder on the cable. To avoid possible injury or damage make sure the fuse is in accordance with the product specifications. Do not connect the bilge pump without ensuring that a proper fuse is in place, in accordance with the bilge pump specifications. For continued fire protection, always replace fuse with new ones of the same type, and the same electrical specifications.
- Clean only with mild detergents, never solvents or corrosive chemicals that may damage the surface of the unit, or the labels containing the product specifications.
- To prevent possible short circuits and corrosion, make sure that all cables, cable contacts, and clamps are placed higher than the highest possible water level, and fastened with isolated fasteners and/or cable ties/ strips.
- The Boat Monitor contains a Li-Ion battery pack.
- If the equipment is used in a way not specified by the manufacturer, it can cause the equipment to not provide the proper protection as advised, causing damage to the unit and personnel.
Placement
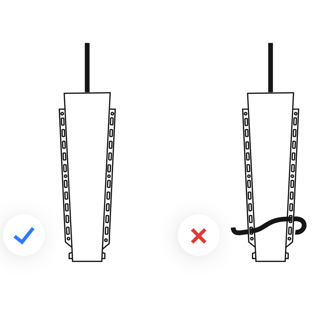
- Place the Bilge Sentry vertically in the bilge with the cable on top.
- To accurately detect water, the unit needs a minimum of 2 inches (5 cm) clearance on the front and sides unobstructed by any wires, hoses, etc. It should also sit at least 1/4 inch (1 cm) off the bottom of the bilge.
- If needed, extension cables can be purchased.
.png?width=318&height=318&name=Bilge%20Sentry%20Installation%20(3).png)
Mounting
- The Bilge Sentry can be mounted with screws, tape or glue. If mounting with screws, be careful not to penetrate the hull.
- Do not attach anything around the module itself.
- Because of the Bilge Sentry’s sensor technology, it should not be mounted nearby metal components, fluid-carrying hoses, or wet surfaces. This can contribute to false readings of higher water levels than actually present.
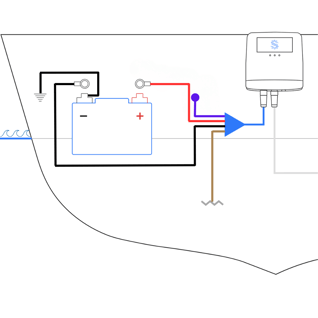
Installation for 1 battery
- Connect the red wire, labeled “Consumption/house battery” to the positive (+) pin on the battery.
- Connect the black wire labeled “Ground” to the negative (-) pin on the battery.
- The purple wire labeled “Starter battery” is not used. It can be secured so it doesn't rattle.
Installation for 2 batteries
- Connect the red wire labeled “Consumption/house battery” to the positive pin (+) on the consumption battery.
- Connect the purple wire labeled “Starter battery” to the positive pin (+) on the starter battery.
- Connect the black wire labeled “Ground” to the negative pin (-) on the consumption battery.
- Make sure the negative pin (-) on both batteries is connected to common ground.
.png?width=318&height=318&name=Two%20battery%20install%20(1).png)
Bilge pump with 2 wires:
The T-splice connector mounts to the positive (+) wire between the bilge pump and the float switch.
Bilge pump with 3 wires:
The T-splice connector mounts to the manual cable. This is the third cable, typically the same cable that connects to the instrument dashboard for manual operation of the bilge pump and indicator light.
See installation video

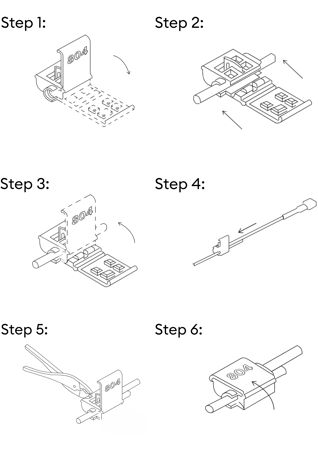
How to mount the T-splice wire:
See the sections below, to decide where the T-splice wire shall be installed.
- Open the hinged side wall on the connector
- Place the connector anywhere along the length of the appropriate bilge pump wire. Position the wire in the channel.
- Close the hinged side wall to capture the bilge pump wire.
- Insert the provided tap wire into the open port of the connector until it stops.
- Using a set of pliers, complete the circuit by pressing the metal u-contact down flush with the top of the connector
- Close the connector top lid and make sure the locking mechanism clicks into place.
Connect to the Battery Cable:
Now that the provided tap wire is attached to the correct bilge pump wire, insert the quick release spade connector into the corresponding connector on the battery cable’s brown & white “Bilge Pump” wire.
Plan for good radio reception
It is important to select a good location for the Boat Monitor.
The unit has internal radio antennas and needs to receive transmissions from both satellites (GPS) and land-based towers (4G cellular).
The higher above the waterline, the better. Metal, carbon fiber or multiple layers of fiberglass will obstruct the signals and should be avoided.
Units with poor reception may experience unsatisfactory tracking, false alarms, no alarms, or an inability to update the app.
Mounting the bracket
- Separate the Boat Monitor from it’s mounting bracket. Carefully review your desired mounting location and make sure that you have at least 3 inches (8 cm) of clearance below the bracket so there’s space to connect the cables.
- Mount the bracket on a solid surface in the rear or middle of the boat, as high as possible.
- Screw, tape or glue the bracket into place.

Connecting cables to the main unit
- Connect both the Bilge Sentry (5-pinned cable) and battery cable (4-pinned cable) to your Boat Monitor.
Confirm the LEDs:
If the cables are correctly connected, the LED lights on the Boat Monitor will flash when transmitting or at least once every 30 seconds.
- The lefthand LED indicates the connection to the boat’s battery. GREEN is good.
- The middle LED indicates GPS quality. GREEN is good and BLUE is adequate. During initial installation, it may take up to 15 minutes to get a ‘fix’.
- The righthand LED indicates 4G reception. GREEN is good.
- LEDs may flash different colors when the system is automatically downloading software updates or for various error conditions.

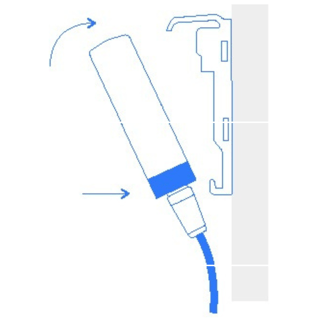
Mounting Boat Monitor to the mounting bracket:
- Align the unit with the wires down (blue part down). The Boat Monitor is secured correctly when it clicks into the mounting bracket.