Make sure the boat is stationary and the engine is turned off while you are installing the Sensar Marine Expansion Hub.
Working near a battery can be dangerous and you should always follow the guidelines of your battery manufacturer. Avoid sparks or flames and make sure you have sufficient ventilation. Use eye protective gear and avoid touching your eyes. Wash hands when finished. Be careful when using metal tools as dropping them on a battery can create a short circuit, and possibly explosion or fire. Remove any personal items like rings, bracelets, necklaces, watches, or similar accessories.
Make sure the battery terminals are clean and the contacts are tightly fastened. Please mount cables to avoid wear and tear, and to prevent short circuits or sparks.

Expansion Hub

Analog Monitoring Cables (Q=2)
- The Expansion Hub is sealed to make sure it always satisfy the manufacturer’s specifications to prevent electrical shock and fire hazards. No components inside can be repaired by unauthorized personnel. Do not try to open or repair yourself. Doing so can risk injury and/or damage, and the warranty will be void.
- Do not connect the bilge pump without ensuring that a proper fuse is in place, in accordance with the bilge pump specifications. For continued fire protection, always replace fuse with new ones of the same type, and the same electrical specifications.
- Clean only with mild detergents, never solvents or corrosive chemicals that may damage the surface of the unit, or the labels containing the product specifications.
- To prevent possible short circuits and corrosion, make sure that all cables, cable contacts, and clamps are placed higher than the highest possible water level, and fastened with isolated fasteners and/or cable ties/ strips.
- If the equipment is used in a way not specified by the manufacturer, it can cause the equipment to not provide the proper protection as advised, causing damage to the unit and personnel.
Mounting
- Carefully review your desired mounting location and make sure that you have at least 3 inches (8 cm) of clearance to the left and right of the Expansion Hub so there’s space to connect the cables.
- Mount on a solid surface.
- Screw, tape or glue into place.
Connecting to the Boat Monitor
- Using the provided 5-pin cable, connect the Expansion Hub to the Boat Monitor.
- It will plug into the "Bilge Sentry" port on the Boat Monitor
- If present, the existing Bilge Sentry cable should be moved to the "Bilge Sentry 1" connection on the Expansion Hub

Bilge pump with 2 wires:
The T-splice connector mounts to the positive (+) wire between the bilge pump and the float switch.
Bilge pump with 3 wires:
The T-splice connector mounts to the manual cable. This is the third cable, typically the same cable that connects to the instrument dashboard for manual operation of the bilge pump and indicator light.

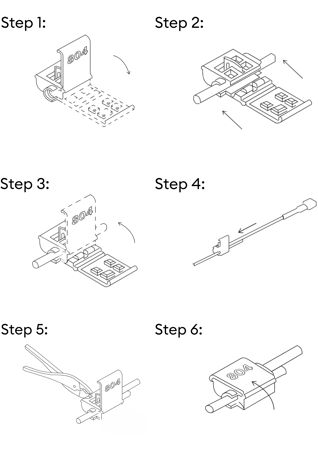
How to mount the T-splice wire:
See the sections below, to decide where the T-splice wire shall be installed.
- Open the hinged side wall on the connector
- Place the connector anywhere along the length of the appropriate bilge pump wire. Position the wire in the channel.
- Close the hinged side wall to capture the bilge pump wire.
- Insert the provided tap wire into the open port of the connector until it stops.
- Using a set of pliers, complete the circuit by pressing the metal u-contact down flush with the top of the connector
- Close the connector top lid and make sure the locking mechanism clicks into place.
Connect to the Expansion 1 Cable:
Now that the provided tap wire is attached to the correct bilge pump wire, insert the quick release spade connector into the corresponding connector on the provided expansion 1 cable’s brown & white “Bilge Pump” wire.